Why Use Canva for Travel Itineraries
If you have ever tried to organize a trip using plain text documents or spreadsheets, you know it can feel lifeless and hard to share. Canva changes that by turning your travel plans into something visually beautiful, easy to read, and genuinely fun to create. Whether you are planning a weekend getaway or a month-long backpacking adventure, Canva gives you the design tools to make your itinerary look professional without any graphic design experience.
Here is why travelers love using Canva for their trip plans:
- Visual and beautiful by default. Every template starts with polished colors, fonts, and layouts. You do not need to worry about spacing or alignment because the templates handle that for you.
- Drag-and-drop editing. Adding photos, swapping icons, and rearranging sections is as simple as clicking and dragging. No learning curve required.
- Hundreds of travel-specific templates. Canva’s library includes templates designed specifically for travel itineraries, packing lists, travel guides, and trip planners.
- Generous free tier. You can access thousands of templates, photos, and design elements without paying anything. The free plan covers most travelers’ needs.
- Share as PDF or link. Send your finished itinerary as a downloadable PDF or share a live link that your travel companions can view anytime.
- Print-ready output. Canva exports high-resolution files that look great when printed, perfect for travelers who prefer paper copies.
For anyone who wants their itinerary to double as a keepsake or a shareable document for family and friends, Canva is hard to beat. If you are looking for more general itinerary options, check out our collection of free itinerary templates.
Best Canva Travel Itinerary Templates
Canva offers a huge library of travel itinerary templates, and they range from clean and minimal to bold and photo-heavy. Here are some of the most popular styles you will find when you search “travel itinerary” inside Canva.
Minimalist Templates
These templates use clean lines, plenty of white space, and simple typography. They work well for business travel or anyone who prefers a no-frills layout. You typically get a structured day-by-day format with room for times, locations, and brief notes. Colors are usually muted (whites, grays, soft pastels), and the focus stays on readability.
Colorful and Playful Templates
Bright gradients, fun icons, and bold color blocks define this category. These templates are popular for family vacations, group trips, and destination celebrations. They bring energy to your itinerary and make it feel more like an invitation than a spreadsheet. Expect to see illustrated icons for activities like dining, sightseeing, and transportation.
Photo-Heavy Templates
If you want your itinerary to showcase destination photography, these templates dedicate large sections to full-bleed images. They work especially well when you have photos from a previous visit or want to include stock images of your destination. The result looks more like a travel magazine spread than a planning document.
Vintage and Retro Templates
Inspired by classic travel posters and old-school postcards, vintage templates use warm tones, serif fonts, and textured backgrounds. They are a great choice for road trips, heritage tours, or any trip with a nostalgic vibe. The design details like stamp motifs and aged paper effects add personality.
Modern and Geometric Templates
Sharp angles, asymmetric layouts, and contemporary color palettes set these templates apart. They appeal to travelers who want something stylish and current. These designs often use grid-based layouts with color-coded sections for different days or activity types.
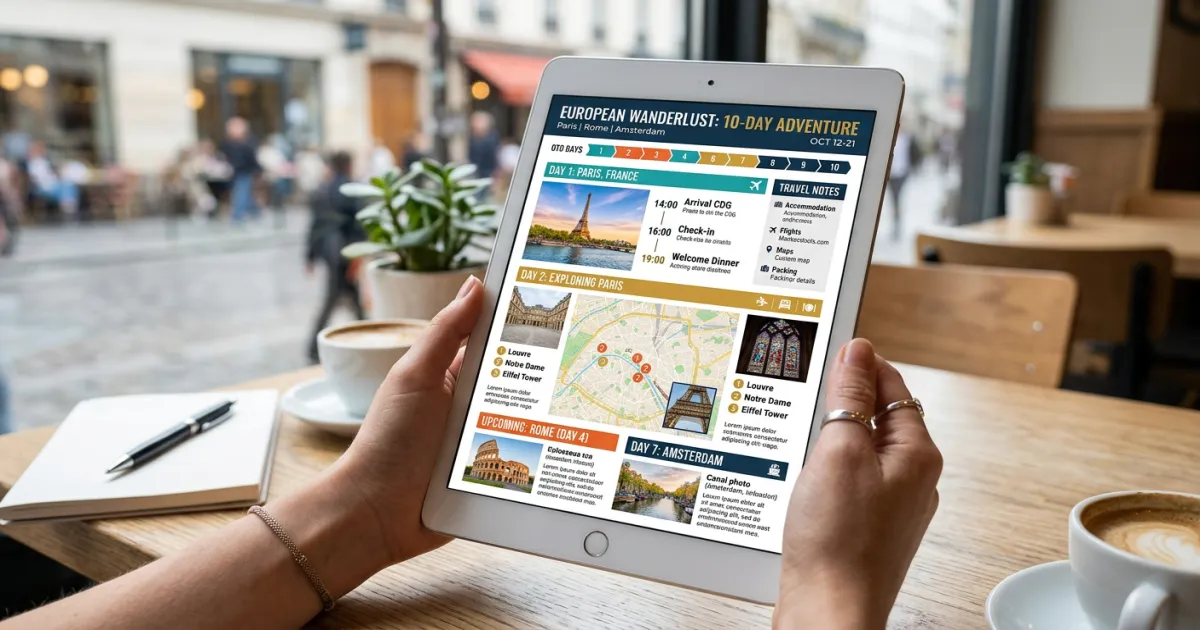
Infographic-Style Templates
These templates present your trip as a visual story, complete with timelines, maps, icons, and data visualizations. They work well for complex multi-city trips where you want to see the overall flow at a glance. Think of them as a hybrid between a traditional itinerary and a visual summary of your entire journey.
How to Create a Travel Itinerary in Canva
Building a travel itinerary in Canva takes about 15 to 30 minutes once you pick a template. Here is the step-by-step process.
Step 1: Search for “Travel Itinerary” in Canva
Log into your Canva account (or create a free one) and type “travel itinerary” in the search bar. You can also try “trip planner,” “vacation itinerary,” or “travel schedule” to see different results. Canva will show you dozens of templates across different styles and sizes.
Step 2: Pick a Template That Fits Your Trip
Browse through the results and click on any template to preview it. Look for one that matches the vibe of your trip. A beach vacation might call for something colorful and photo-heavy, while a business trip works better with a clean minimalist layout. Pay attention to the number of pages included, as some templates come with multi-page designs for longer trips.
Step 3: Customize Colors and Fonts
Once you open the template in the editor, click on any text or design element to change it. Use the color picker to match your preferred palette, or try Canva’s “Style” feature to apply a completely new color scheme and font combination in one click. Consistency matters here, so stick with two or three colors and one or two font families.
Step 4: Add Your Trip Details Day by Day
Replace the placeholder text with your actual plans. Include the date, time, activity name, location, and any confirmation numbers or addresses you will need. Organize your content by day, and use headers or dividers to keep each day’s plans visually separate. If you need more pages, duplicate an existing page and modify it.
Step 5: Add Photos and Visual Elements
Upload your own photos or browse Canva’s stock photo library (millions of free images available). Drag photos into image placeholders, add map screenshots, or include icons for activities like flights, hotels, restaurants, and sightseeing. Canva’s element library also has travel-themed stickers, frames, and illustrations.
Step 6: Download or Share
When your itinerary is complete, click the “Share” button in the top right corner. You can download it as a PDF (best for printing or emailing), PNG, or JPG. You can also generate a shareable link so your travel companions can view the itinerary online. For collaborative planning, you can even invite others to edit the document directly.
Need help figuring out what to include in your itinerary? Our guide on how to plan a trip covers everything from choosing destinations to building your daily schedule.
Canva Free vs Pro for Travel Planning
Canva’s free plan is surprisingly capable for travel itinerary creation, but the Pro plan adds features that power users and frequent travelers will appreciate. Here is how they compare.
| Feature | Canva Free | Canva Pro ($12.99/month) |
|---|---|---|
| Templates | Thousands of free templates | All templates, including premium designs |
| Stock Photos | 1 million+ free photos | 100 million+ premium photos and videos |
| Storage | 5 GB cloud storage | 1 TB cloud storage |
| Brand Kit | Not available | Custom fonts, colors, and logos |
| Background Remover | Not available | One-click background removal |
| Resize | Fixed dimensions | Magic Resize for any format |
| Export Options | Standard quality | SVG, transparent backgrounds |
| Folders | Limited organization | Unlimited folders |
For most travelers creating one or two itineraries per year, the free plan is more than enough. If you create itineraries regularly (for a travel blog, a travel agency, or frequent group trips), Canva Pro’s premium templates and expanded photo library make the upgrade worthwhile.
When Canva Is the Best Choice
Canva excels in specific travel planning scenarios. It is the right tool when you want to:
- Create a visual presentation of your trip. If your itinerary needs to look polished and professional, Canva delivers better results than any spreadsheet or text document.
- Share with family and friends. A well-designed Canva itinerary is easy to read and enjoyable to browse. It works especially well for group trips, weddings, and family reunions where you want everyone to feel excited about the plans.
- Print your itinerary. Canva’s export options produce high-resolution files that look crisp on paper. You can print at home or send to a print shop.
- Post on social media. Many travelers share their itineraries on Instagram, Pinterest, or TikTok. Canva makes it easy to create social-media-ready versions of your travel plans.
- Build a trip keepsake. After your trip, you can update your itinerary with actual photos from your journey and create a beautiful memory book.
When to Use Other Tools
While Canva handles the visual side of travel planning beautifully, some planning tasks are better served by other tools.
- Google Sheets works better for data-heavy planning. If you need to track budgets across multiple currencies, compare flight prices, or manage complex logistics for a large group, a spreadsheet gives you more flexibility.
- Notion is ideal for database-style trip planning. You can create linked databases for hotels, restaurants, and activities, then filter and sort by date, location, or category.
- Yopki’s AI travel planner generates complete itineraries automatically. Instead of starting from a blank template, you get a personalized day-by-day plan based on your destination, travel dates, and preferences. It is the fastest way to go from “I want to visit Tokyo” to a fully planned trip.
- Excel remains the go-to for detailed budget tracking, especially when you need formulas, pivot tables, or charts to analyze your travel spending.
Many travelers combine tools. You might use Yopki to generate the initial itinerary, then transfer the key details into a Canva template for a beautiful shareable version.
Tips for Great Canva Itineraries
A few design and content decisions will make your Canva itinerary much more useful and attractive.
- Keep it simple. Resist the urge to fill every inch of space. White space makes your itinerary easier to scan, especially on mobile devices.
- Use consistent colors. Pick two or three colors and use them throughout. Canva’s color palette tool can extract colors from a photo, which is a great way to match your itinerary’s look to your destination.
- Include only essential information. For each activity, stick to the time, name, location, and one key note (like a confirmation number or dress code). Save lengthy descriptions for a separate document.
- Add QR codes for booking links. Canva has a QR code generator in its app library. Create QR codes that link to your hotel reservations, restaurant bookings, or attraction tickets. When you print your itinerary, you can scan the codes with your phone for instant access.
- Export as PDF for offline access. Download your finished itinerary as a PDF and save it to your phone. This way you can access your plans even without internet service, which is common when traveling internationally.
- Design for mobile viewing. Many of your travel companions will view the itinerary on their phones. Use large enough fonts (at least 10pt), and make sure important details are not hidden in tiny text.
- Create a cover page. A simple cover page with the destination name, dates, and a beautiful photo sets the tone for the entire document. It also makes the itinerary feel more special and complete.
For more itinerary formatting ideas, browse our printable itinerary templates.
Other Template Formats
Canva is just one option in a world full of itinerary template formats. Depending on your planning style, you might also want to explore:
- Google Docs templates for simple, text-based itineraries you can edit collaboratively in real time.
- Google Sheets templates for spreadsheet-style planners with built-in formulas for budgets and time calculations.
- Word and PDF templates for traditional formatted documents that work offline and print cleanly.
- Notion templates for database-driven planning with linked tables, filters, and custom views.
Check out our full templates hub for a curated collection across all formats.
Planning Tools Beyond Templates
Templates give you a framework, but you still need to decide where to go, what to do, and how to organize your days. That is where dedicated planning tools come in.
If you want a faster starting point than a blank template, try Yopki’s AI travel planner. It builds a complete day-by-day itinerary based on your destination, dates, interests, and pace. You can then take that plan and drop it into a Canva template for a beautiful final version.
For step-by-step guidance on the entire trip planning process, from choosing a destination to booking flights and accommodations, read our complete guide to planning a trip.
Frequently Asked Questions
Is Canva free for making travel itineraries?
Yes. Canva’s free plan includes thousands of travel itinerary templates, over a million stock photos, and all the editing tools you need to create and download a finished itinerary. You only need Canva Pro if you want access to premium templates, additional stock photos, or advanced features like background removal.
Can I print my Canva travel itinerary?
Absolutely. Download your itinerary as a high-quality PDF and print it at home or at a print shop. Canva also offers a print service that will print and ship physical copies directly to you.
Can multiple people edit a Canva itinerary at the same time?
Yes. Canva supports real-time collaboration. Share your itinerary with a link and give editing permissions to your travel companions. Everyone can add their preferences, update times, or swap out photos simultaneously.
What size should I make my Canva travel itinerary?
For a standard printable itinerary, use US Letter (8.5 x 11 inches) or A4 (210 x 297 mm). If you are designing primarily for mobile viewing, consider a taller format or use Canva’s presentation mode for a slide-based layout.
Can I use my Canva itinerary offline?
Once you download the itinerary as a PDF, you can open it anytime without internet access. Save it to your phone’s files app or a cloud service like Google Drive or Dropbox that supports offline access.
How do I add maps to my Canva itinerary?
Canva does not have a built-in map tool, but you can take a screenshot of Google Maps showing your route or destinations and upload it as an image. Place it on your itinerary page and resize it to fit your layout.